Lab-1-1
(2% of the course mark)
Node.js Lab
- The first Node.js lab introduces learners to the fundamentals of server-side JavaScript development. Through hands-on exercises, participants gain an understanding of setting up a basic Node.js environment.
Lab objectives
-
Understand the basics of server-side JavaScript development.
-
Set up a Node.js development environment on your local machine.
Create basic Node.js app
-
Open VSCode and create a folder named First-Node-Js-App.
-
Open the terminal and change the directory to First-Node-Js-App.
-
Initialize the app by running the following command:
npm init
- For now keep on pressing enter to accept the defaults.
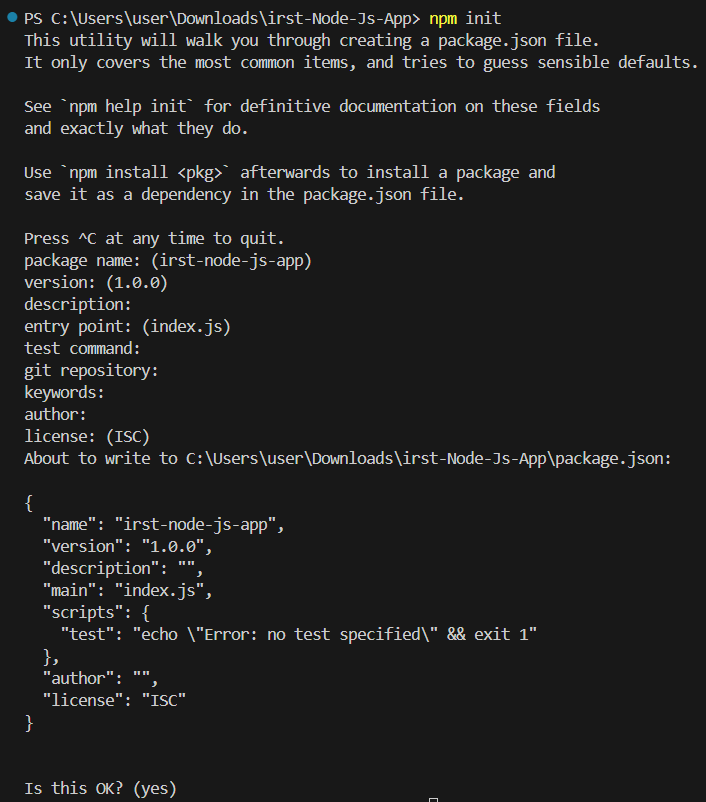
Use the following command to accept all defaults and skip the individual prompts.
npm init -y
- Create a file named index.js and add the following code:
console.log("Hello World");
-
Save the changes.
-
In the terminal, run the following command:
node index.js
- Take a screenshot of the terminal output and save it as node01.png.
Modify basic Node.js app
- Modify index.js and copy the following code:
function printObject(objectToPrint) {
  console.log(typeof objectToPrint, ":", objectToPrint);
}

printObject(1);
printObject(true);
printObject("Hello World");
printObject({ firstName: "Bill", lastName: "Gates" });

function concat(firstParam, secondParam) {
  return firstParam + " " + secondParam;
}

console.log(concat("Elon", "Musk"));

class Employee {
  firstName;
  lastName;
  role;

  constructor(firstName, lastName, role) {
    this.firstName = firstName;
    this.lastName = lastName;
    this.role = role;
  }

  setFirstName(firstName) {
    this.firstName = firstName;
  }

  setLastName(lastName) {
    this.lastName = lastName;
  }

  setRole(role) {
    this.role = role;
  }

  getFirstName(firstName) {
    return this.firstName;
  }

  getLastName(lastName) {
    return this.lastName;
  }

  getRole(role) {
    return this.role;
  }
}

const user1 = new Employee("Mark", "Zuckerberg", "admin");
console.log(user1.getFirstName(), user1.getLastName(), user1.getRole());

user1.setFirstName("Jeff");
user1.setLastName("Bezos");
user1.setRole("developer");
console.log(user1.getFirstName(), user1.getLastName(), user1.getRole());
-
Save the changes.
-
In the terminal, run the following command:
node index.js
- Take a screenshot of the terminal output and save it as node02.png.
Convert Node.js app to TypeScript
- Install typescript by running the following commands:
npm install typescript -D
npm install @types/node -D
- Initialize tsconfig.json by running the following command:
npx tsc --init
-
Modify tsconfig.json and uncomment outDir.
-
Modify tsconfig.json and add the following property:
"removeComments": true
- Configure package.json by adding a new entry to scripts property.
"build": "tsc",
"start-js": "node ./dist/index",
"start-ts": "node index.ts"
-
Rename index.js to index.ts.
-
Modify index.ts and copy the following code:
// Add parameter type
function printNumberObject(objectToPrint: number) {
  console.log(typeof objectToPrint, ":", objectToPrint);
}

// Add parameter type
function printBooleanObject(objectToPrint: boolean) {
  console.log(typeof objectToPrint, ":", objectToPrint);
}

// Add parameter type
function printStringObject(objectToPrint: string) {
  console.log(typeof objectToPrint, ":", objectToPrint);
}

// Create a User interface to be used as a type
interface User {
  firstName: string;
  lastName: string;
}

// Use the User interface as a type
function printCustomObject(objectToPrint: User) {
  console.log(typeof objectToPrint, ":", objectToPrint);
}

printNumberObject(1);
printBooleanObject(true);
printStringObject("Hello World");
printCustomObject({ firstName: "Bill", lastName: "Gates" });

// Add a type for the parameters and return value
function concat(firstParam: string, secondParam: string): string {
  return firstParam + " " + secondParam;
}

console.log(concat("Elon", "Musk"));

// Employee class definition
class Employee {
  // Properties are private
  private firstName: string;
  private lastName: string;
  private role: string;

  // Create an instance of the class, using constructor
  constructor(firstName: string, lastName: string, role: string) {
    this.firstName = firstName;
    this.lastName = lastName;
    this.role = role;
  }

  // Setters and Getters are public
  public setFirstName(firstName: string) {
    this.firstName = firstName;
  }

  public setLastName(lastName: string) {
    this.lastName = lastName;
  }

  public setRole(role: string) {
    this.role = role;
  }

  public getFirstName() {
    return this.firstName;
  }

  public getLastName() {
    return this.lastName;
  }

  public getRole() {
    return this.role;
  }
}

// Create an instance of an Employee class
const user1 = new Employee("Mark", "Zuckerberg", "admin");

// Display the properties
console.log(user1.getFirstName(), user1.getLastName(), user1.getRole());

// Update the Employee properties
user1.setFirstName("Jeff");
user1.setLastName("Bezos");
user1.setRole("developer");

// Display the properties
console.log(user1.getFirstName(), user1.getLastName(), user1.getRole());
- In the terminal, run the following command:
npm run start-ts
-
Take a screenshot of the terminal output and save it as node03.png.
-
In the terminal, run the following commands:
npm run build
npm run start-js
- Take a screenshot of the terminal output and save it as node04.png.
Custom TypeScript code
- Modify index.ts and add the code to satisfy the following requirements:
-
Create any function that accepts any parameter and returns a value. Call this function and display the results.
-
Create any Class and make sure the following concepts are demonstrated:
-
Usage of private and public keywords.
-
Usage of getters and setters.
-
Usage of a constructor.
-
Use the setter functions to update the value.
-
Use the getter functions to return the value.
-
Call the getter functions and display the data.
-
- In the terminal, run the following commands:
npm run start-ts
-
Take a screenshot of the terminal output and save it as node05.png.
-
In the terminal, run the following commands:
npm run build
npm run start-js
- Take a screenshot of the terminal output and save it as node06.png.
Submission
- Create a folder named submit.
Delete the node_modules folder on any app that you are submitting.
-
Copy the First-Node-Js-App folder and all the screenshots (node01.png, node02.png, node03.png, node04.png, node05.png and node06.png) to the submit folder.
-
Create a zip file of the submit folder.
-
Navigate back to where the lab was originally downloaded, there should be a Submissions section (see below) where the zip file can be uploaded.